Top 10 Science Experiments Your Kids Will Love
Published 11 May 2024 at 01:09
Tickikids Blog Ras al-Khaimah > Top 10 Science Experiments Your Kids Will Love

For children, everything incomprehensible seems like magic. Magnetism, color changes, explosions, rainbows in a glass - everything looks so unusual and exciting!
Parents, seize the moment and take advantage of your kids' natural curiosity. This is your chance to turn an ordinary evening at home into a real lesson in potions or magic, and eventually teach them what kind of "magic" is behind each such miracle
We have rounded up some easy at-home experiments that you can recreate, so next time when you need to keep your little ones busy and excited, we’ve got you covered!
So, a sprinkle of baking soda, and a few drops of lemon juice - and let the home science magic begin!
Editor’s Tip
Remember to prepare in advance!
The basic science experiments can be really messy. So, take your time to make some preparations: find a white coat, gloves and goggles for your little scientist. And imagine how thrilled they will be with their new cool look!
Video Credit: MiliBooth
Color Changing Potion
If you are searching for some “magical” science experiments for 5-year-olds, you are on the spot! It is your chance to charm them into science projects through magic, especially if they are fond of Harry Potter films or books.
So, let’s start our Potions class!
Get ready:
- Red Cabbage ( chopped )
- A pan
- Water
- Strainer
- Selection of jugs, jars, and beakers - -the more whimsical, the better!
- Vinegar
- Baking soda
Boil red cabbage in a pan (the water should just cover the shredded cabbage) until the water in the pan turns purple. Then pour the mixture of water and cabbage through the strainer into a container. Pour this solution into jugs, jars, and beakers up to the middle of each. Then add different amounts of baking soda and vinegar to each vial. And watch how the liquid starts to change color in every jar! And, to add make this fun science project more interesting, add some baking soda to the jars with vinegar. Fizzy potion, which changes color in front of your eyes, will not leave anyone indifferent!
The science behind this cool science project is simple. Red cabbage includes a substance called anthocyanin. This changes color according to the acidity of its surroundings. It turns pink/red in the presence of an acid, purple when neutral, and blue or green when mixed with an alkaline material.
Video Credit: Ryan Toy Review
Eggs in Different Liquids
This is one of the favorite science experiments at home for parents. You can surely use this cool STEM project as a reminder for your kids to brush their teeth every morning and evening, especially when they prove all the benefits of using toothpaste on their own.
Get ready: 4 white eggs, 4 glasses, lemon juice, and soda.
Start by pouring two glasses of soda and two glasses of lemon juice, filling each to halfway, and labeling them as Juice 1, Juice 2, Soda 1, and Soda 2. Next, carefully place an egg in each glass overnight. However, before immersing them, it's essential to generously coat two eggs with toothpaste, ensuring they're completely covered with a thin layer of paste, before placing them in Soda 2 and Juice 2 glasses.
The next morning, when it's time to remove the eggs from the glasses, the children will be amazed by the results. The eggs in the soda glasses will appear different, with one absorbing the soda's color while the other remains protected by the toothpaste. Similarly, the eggs in the juice glasses will exhibit variation; the acid in the lemon juice will dissolve the unprotected eggshell, leaving it weak and soft to the touch.
Thus, kids will see the importance of toothpaste and why it is necessary to brush their teeth. And, it is a great way to explain the properties of acids.
Video Credit: Ibrahim World
Floating Fish
If you are looking for cool science experiments for elementary students, this one's for you.
Get ready: a deep plate or tray, a spoon, a dry-erase marker, and some water.
To start, use a dry-erase marker, ensuring it's not permanent, to sketch a charming little fish on the back of a spoon. Carefully redraw the outline multiple times, ensuring all lines are connected. Then, pour water into a plate or tray and slowly lower the spoon into the water. Voilà! Watch as the drawn fish magically floats!
This captivating science project delves into concepts of solubility and density, offering an excellent opportunity to explore the properties of silicone polymers found in dry-erase markers. These markers are designed to wipe off surfaces easily, thanks to this polymer. Thus, when submerged, the polymer lifts the fish drawing from the spoon's surface, while the non-water-soluble ink remains intact. Additionally, because the ink is lighter than water, it effortlessly remains afloat on the surface.
Video Credit: Ryan Toys Review
Taste the rainbow
This is one of the super simple science experiments that any kid can repeat at home.
Get ready: a plate, Skittles, and some water.
This colorful science experiment isn't just visually appealing; it's also an excellent opportunity to explore concepts of water solubility and color blending.
To conduct this simple experiment, children should arrange the Skittles in a circle along the outer edge of a plate, following a rainbow sequence for the best results. Next, carefully pour water into the center of the plate, ensuring it just covers the candies. Soon after, the colors will begin to dissolve, creating a stunning rainbow pattern in the water.
This phenomenon occurs because water dissolves the food coloring within the sugar coating of the candies, as both sugar and coloring are soluble in water.

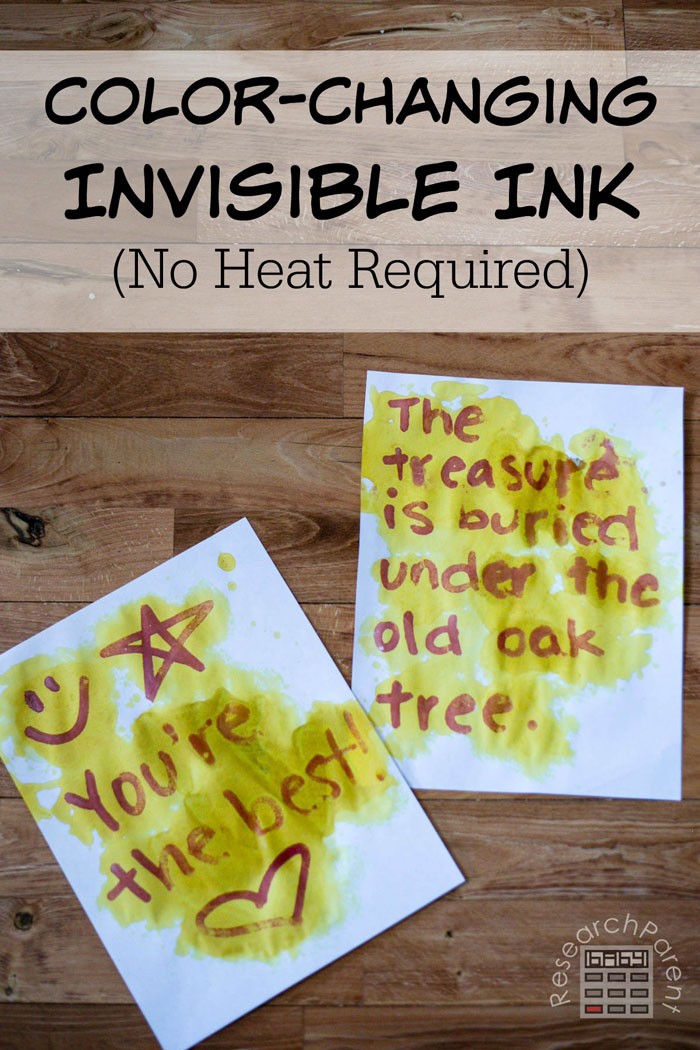
Image Credit by: The Research Parent
Color Changing Invisible Ink (No heat required!)
Let your children step into the shoes of private investigators straight out of spy novels with this engaging activity!
This intriguing experiment, along with numerous other simple science activities for home, is curated by The Research Parent. We highly recommend exploring their website, as it offers a wealth of captivating and educational experiments!
Get ready: water, baking soda, paper, q-tips (or a paintbrush) to apply invisible ink, rubbing alcohol, turmeric, and paper towels (or a paintbrush) to apply a color-changing solution.
A detailed description of the experiment is on the website and rest assured, your kids will be fascinated when they reveal hidden messages on a blank piece of paper!
Video Credit: Dear Smart Girl
Make a Slime
Yes, it can be messy, however, you won’t find other STEM science projects that kids love as much as they love slimes.
There are many recipes for slimes yet, here is one of the most traditional ones.
Get ready:
- 2/3 cup of Elmer’s White Glue
- 1/2 teaspoon Baking Soda
- 1/4 Cup Water
- 2-3 cups Shaving Cream – note: do not use shave gel.
- 1.5 Tablespoons Contact Lens Solution – *Important: your brand of contact lens solution must have boric acid and sodium borate
Mix glue, water, and baking soda in a bowl, add shaving cream, and mix. After that, slowly add the contact lens solution and knead the mixture. It will be very sticky at first - that’s normal.
You can use it as a foundation for your slime, and then, improvise!
There are literally thousands of slime-making videos on YouTube that you can use as a source of inspiration, especially when you are looking for a science project for Science Day. Because slimes provide so much room for creativity, you can choose from the simplest experiment to a NASA-level project. It can be magnetic slimes, glow-in-the-dark, edible, radiative-looking, thermochromic color-changing, flobber and so much more! So, choose a slime and get creative!
Video Credit: Melody Yang
Create the biggest bubbles ever
It is the very weather to go and spend some time outside. So, why don’t you get prepped in advance and make a solution for the huge bubbles? It is one of those summer STEM activities where you can explain the notion of surface tension in a fun and exciting way.
Get ready:
- 3.5 Liters water
- 350 ml - dish soap
- 1/2 Tablespoon - guar gum
Slowly mix water, soap, and guar gum in a bucket and let it sit for several hours. The longer you let it sit, the bigger and stronger the bubbles will be.
And, to make bubbles, you will need a giant bubble wand!
- 54 inches of cotton kitchen string
- 2 2-feet long sticks
- A metal washer
Fasten a washer onto the string and visually identify the point where the 36-inch mark will fall. Ensure the washer remains positioned along the longer segment of the string. Securely affix the stick at this mark, then attach the ends of the string to another stick. This arrangement will form a triangular shape with the washer suspended downward.
To do this hands-on experiment, immerse the wand into a container of soapy water with the sticks aligned parallel and close together. Gradually separate the sticks, and the string will once again form a triangular shape, this time with a bubble in the center.
When initiated or influenced by the wind, sizable bubbles will emerge. The underlying physics of this intriguing phenomenon are straightforward: water molecules exhibit a tendency to adhere to one another, resulting in what's known as surface tension. Soap molecules disrupt this cohesion, yet when a bubble is blown, water forms a thin layer encased between two layers of soap.
Video Credit: BeardedScienceGuy
Carbon Sugar Snake
We all know about the star of all science fair projects - an erupting volcano. However, here is an alternative, more spectacular and made with the ingredients that we can find at home.
Editors note:
This is one of the super cool science experiments that definitely require parent’s supervision and is aimed at kids aged 12+.
Get ready:
- A pie tin
- 5-6 cups sand
- baking soda (1 tsp)
- powdered sugar (4 tsp)
- mixing bowl - small
- lighter fluid - or ethanol
- A lighter
A black snake emerging from the ground looks stunning and kids love it!
To craft this mesmerizing creation, thoroughly blend baking soda with powdered sugar. Next, fill a pie tin with sand, forming an indentation in the center with your fist. Pour lighter fluid into the indentation, ensuring the sand becomes thoroughly soaked. Then, place the soda-sugar mixture into the indentation and ignite the sand nearby. Step back and watch!
The science behind this phenomenon lies in a combination of combustion (burning) and decomposition chemical reactions. As the sugar burns, it produces water vapor and carbon dioxide, propelling the soda-sugar mixture upward. Meanwhile, sugar deprived of oxygen undergoes decomposition, forming solid carbon that contributes to the snake's shape and color. Simultaneously, the decomposition of soda generates additional solid sodium carbonate, along with carbon dioxide and water vapor.